Saturday, July 28, 2012

Attic Progress


New stairs...what an improvement!   
They were so shallow and steep before.

 You can see from this photo the 
change in the length.   
The stairs used to end where 
the old railing is now.

 When you come up the stairs you 
get to this landing area.

I am going to use this an an office 
and sitting area
right off the master bedroom.


This side area shown below will be 
where I put a desk. 
It also serves as a hallway. 
 This is the view looking
into the master bedroom.
I made the room big enough for 
2 dressers, 2 nightstands 
and a king size bed.
I wanted the sitting area to be sectioned 
off rather than incorporating 
it into the master
bedroom. 

This opening for double french doors.
I want the sitting area to be 
as open as possible to
the master bedroom. 

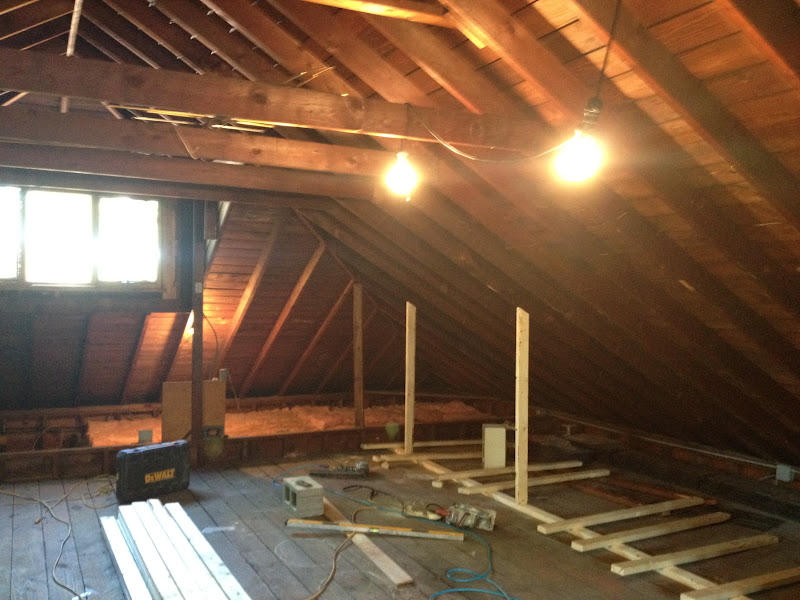
The bed will go under the windows.

 I will add a light fixture over the 
bed in the 
vaulted ceiling area.

 The bathroom is across the hall.
We had to order a special toilet
that is installed out the back 
and not down because we are dealing 
with an old house.
They had to create a cavity for the plumbing...
going to add shelves for storage on the ledge.
 This is a niche for towel storage.
I also have more room for storage at 
the end of the tub.
I am tempted to use this as a little seat
for tub supervision
with my preschooler.


 Planning to add a 48" wide vanity here 
with side lights.
Just picked up a cool mirror from 
a garage sale
for the bathroom. 


This is my daughter's future room.   
Made the window seat deep enough to 
accomodate twin mattress.

 This is a walk in closet for her room.
 This corner where the ladder is 
will fit a full size bed perfectly!
Installed an electric box so I can hang 
a mini vintage pendent next to her bed.  


 This is looking out of her room out into
the hallway area.
 This is the hallway/office area.  
This will remain a half wall
to keep it open.


 We had a furnace installed, plumbing all done, 
electric roughed in.
Next is foam insulation and drywall.
Then my husband will be painting 
to save a bit of money.

Busy looking for the flooring and 
finalizing all my lighting.

Will post more as we go though the process...
feel very lucky and excited 
to be doing this project!

Saturday, July 14, 2012

attic renovation

Can't believe the summer is half over
...crazy entertaining three kids, 
working design jobs,
keeping up with housework,
 and have a big project 
in my own home to share
...an attic renovation.

This space was a huge selling 
point when my husband and 
I bought our home...
really excited to be 
doing something with this space!

Would have loved to keep it a 
giant master suite
...all open and vaulted
but need to get 2 bedrooms 
and a bath
up there so I came 
up with 
a plan.

Here are some before shots...


These stairs are being rebuilt
...very steep!

 Space planning and incorporating 
plumbing was quite a challenge 
to figure out...
required several meetings to 
brainstorm with my 
contractor and plumber.

I am also trying to keep this 
project on a budget
which forces more creativity
in my design...
a challenge I love.

I used my preschoolers 
chalk to 
draw out all my concepts 
on the floors... 
(after figuring out plumbing!)

Then spent countless hours
drawing out the 
best way to do the 
space planning to scale. 


 Everyone in my family will have 
a new bedroom.   
My boys will stay down and 
move into the bigger bedrooms 
on the lower level.
My daughter will move 
upstairs with
my husband and me.

Lots of decorating to come!
 Planning on keeping as much 
vaulted as possible...
 My contractor has been sweating 
his tail off with his crew...
He has named this project
"Amy's Fat Farm"
He has dropped several 
pounds working up in 
the hot attic!

Finishing up now on the framing 
of all the walls so will 
show you that next...
will start to make more sense
with what is the space is 
going to end up being.
I was able to get a siting area, 
office space, 2 bedrooms
and a bathroom up here...
very excited! 

Saturday, July 7, 2012

no sew window treatment


I created this 
fun window treatment 
for my son's room 
from a branch, twine, 
small clothes pins, 
and fabric swatches.

I lucked out that this branch 
was just lying in my 
yard after a storm.

I cut the fabric into little triangles
and hung them from the twine.   
I tied the twine to 
each end of 
the branch.  
I left the brackets up from the 
rod to support the branch.

I had to play with the fabric.   
I wanted to have a mismatched 
effect with the fabric 
without them clashing so a 
little rearranging was in order.

This added a great touch 
and personality to his room.